Easy Installation of Paver Pedestal System
|
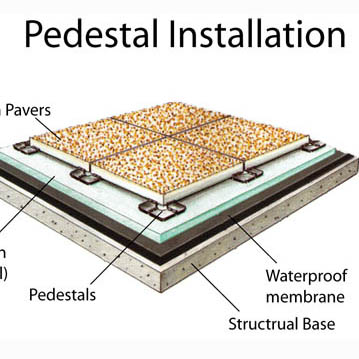
Tile Tech Paver Pedestal System is designed for concrete
pavers to lay level over a built up roof. The substrate
can be either concrete or wood structure, with a roof
membrane over the top.
Tile Tech Pedestal System consists of 7 pieces
and a standard 4" diameter PVC pipe:
- Top Cap
- Bottom Cap
- Top Shims of 1/16" and 1/8"
- Round Bottom Shims of 1/16" and 1/8"
- Buffer Pad (optional)
|
|
 |
The PVC pipe allows the Pedestal System to vary in heights
up to 20+ inches. The standard 1/8" vertical spacer
on the top cap allows for an open joint and proper alignment
of the pavers.
The top cap is 1/2" in height, if required a 1/16"
or 1/8" bottom shim locks into the bottom of the
top cap. Once 1" in height is obtained, the top
and bottom cap can be used with PVC and 1/8" and
1/16" bottom shims.
|
|
The uniqueness of the round bottom shims, both 1/16" and 1/8"
allow them to be broken in half and stacked on the bottom shim for
those areas that are sloped more than the typical 2%. They have a
"V" groove on the bottom. One pass through with a utility knife,
allows for easy breakage. They may be stacked on the bottom.
They lock to the cap to impede movement of the pedestal. The
subsequent weight of the paver will keep the system in place.
|
Paver Pedestal System Installation Steps
A typical installation would start off the threshold of a
door or control point, provided by architect or contractor.
The first height of the Pedestal System pedestal is then determined.
(A standard chop saw with fine tooth blade (12") compatible
with plastic) can cut the PVC height insert.
An installer then cuts the PVC to the required height, less the 1/4"
inset for each top and each bottom cap, e.g., a 1-1/2" pedestal needs 1"
PVC and the 1/2" top piece which insets 1/4", plus the 1/2" bottom cap
which insets 1/4" -- making the total pedestal 1-1/2" high.
The "press fit" of the caps -- top and bottom -- requires no gluing or
other attachments. The caps can be easily removed during installation if desired.
Both the small top shims and round bottom shims can be used for "fine tuning" the
proper height, if required. All top shims and bottom shims lock into place, and
all six pieces (if used) interlock, allowing no paver movement and a level surface.
For proper heights lower than 1/2" the AWS Pedestal System
standard cross, 1" l ong, 1/2" high and 1/8" thick can be
used with the AWS Pedestal System standard 4"x4" square shim,
both in 1/16" and 1/8" thickness (though we recommend that
if construction permits, it is always preferable to have at
least a 1" gap under pavers to allow for airflow and water
movement).
The 4" PVC used in the Pedestal System may
be either of two standards: 2729 or 3034. Both are off-the-shelf
products, standard in North America with the outside dimension
of 4.215", matching the inside diameter of the Pedestal System
top and bottom cap.
Typical use is the thin wall PVC (2729). Independent compression
tested from 1" up to 5", ranges from 7,000 to 15,750 psi. Thicker wall
PVC (3034) 4.210" OD, 5" up to 27" compression tested 11,000 to 13,200
psi. (NOTE: all testing done with both top and bottom Pedestal
System caps in place.)
|